
How to track lead source in Zendesk Chat
Track lead source in Zendesk Chat by piping every Messaging ticket to SourceLoop with the visitor's marketing attribution attached as conversation tags.


On this page
- What SourceLoop captures from Zendesk Chat
- Before you start
- Step 1: Install the SourceLoop tracking script
- Step 2: Embed your Zendesk widget on the same pages
- Step 3: Create the Zendesk webhook
- Step 4: Create the trigger that fires on new conversations
- Step 5: Add an automation to catch late-email tickets
- Step 6: Run a verification chat
- Where to see Zendesk conversations in SourceLoop
- Contacts
- Traffic and Revenue report
- Funnel reports
Zendesk Messaging (and the legacy Web Widget Chat) is the conversation surface inside the Zendesk Suite that established support and sales teams have built their workflow around. The piece it doesn’t surface, like every chat tool, is which marketing campaign produced each conversation.
SourceLoop adds that layer in a semi-automated setup. The tracker attaches your visitor’s attribution to every new conversation as Zendesk tags, then a webhook + trigger + hourly automation in Zendesk forwards each ticket to SourceLoop so the conversation becomes a lead with full marketing context.
Six steps, around fifteen minutes. Works on every Zendesk Messaging plan.
What SourceLoop captures from Zendesk Chat
For each Zendesk conversation that captures an email, SourceLoop attaches:
- The visitor’s acquisition channel (organic, paid, social, referral, direct)
- UTM parameters parsed from the landing URL
- First-touch landing page of the visitor’s journey
- Source of the converting session that produced the chat
- Pages browsed before the chat started
- Time on site and return-visit count ahead of the conversation
- Email + name + phone from the Zendesk ticket requester
- Device, country, browser of the converting session
Before you start
You’ll need:
- A SourceLoop workspace (free trial)
- Edit access to your site’s
<head>markup - A Zendesk account on a plan that includes Triggers, Automations, and Webhooks (every paid Zendesk plan and the trial)
- Admin access to Zendesk Admin Center (required to create webhooks, triggers, and automations)
- A Messaging bot or flow that asks the visitor for their email at some point in the conversation
Step 1: Install the SourceLoop tracking script
- Sign in to SourceLoop.
- Open Setup -> Tracking code in the left sidebar.
- Copy the snippet shown.
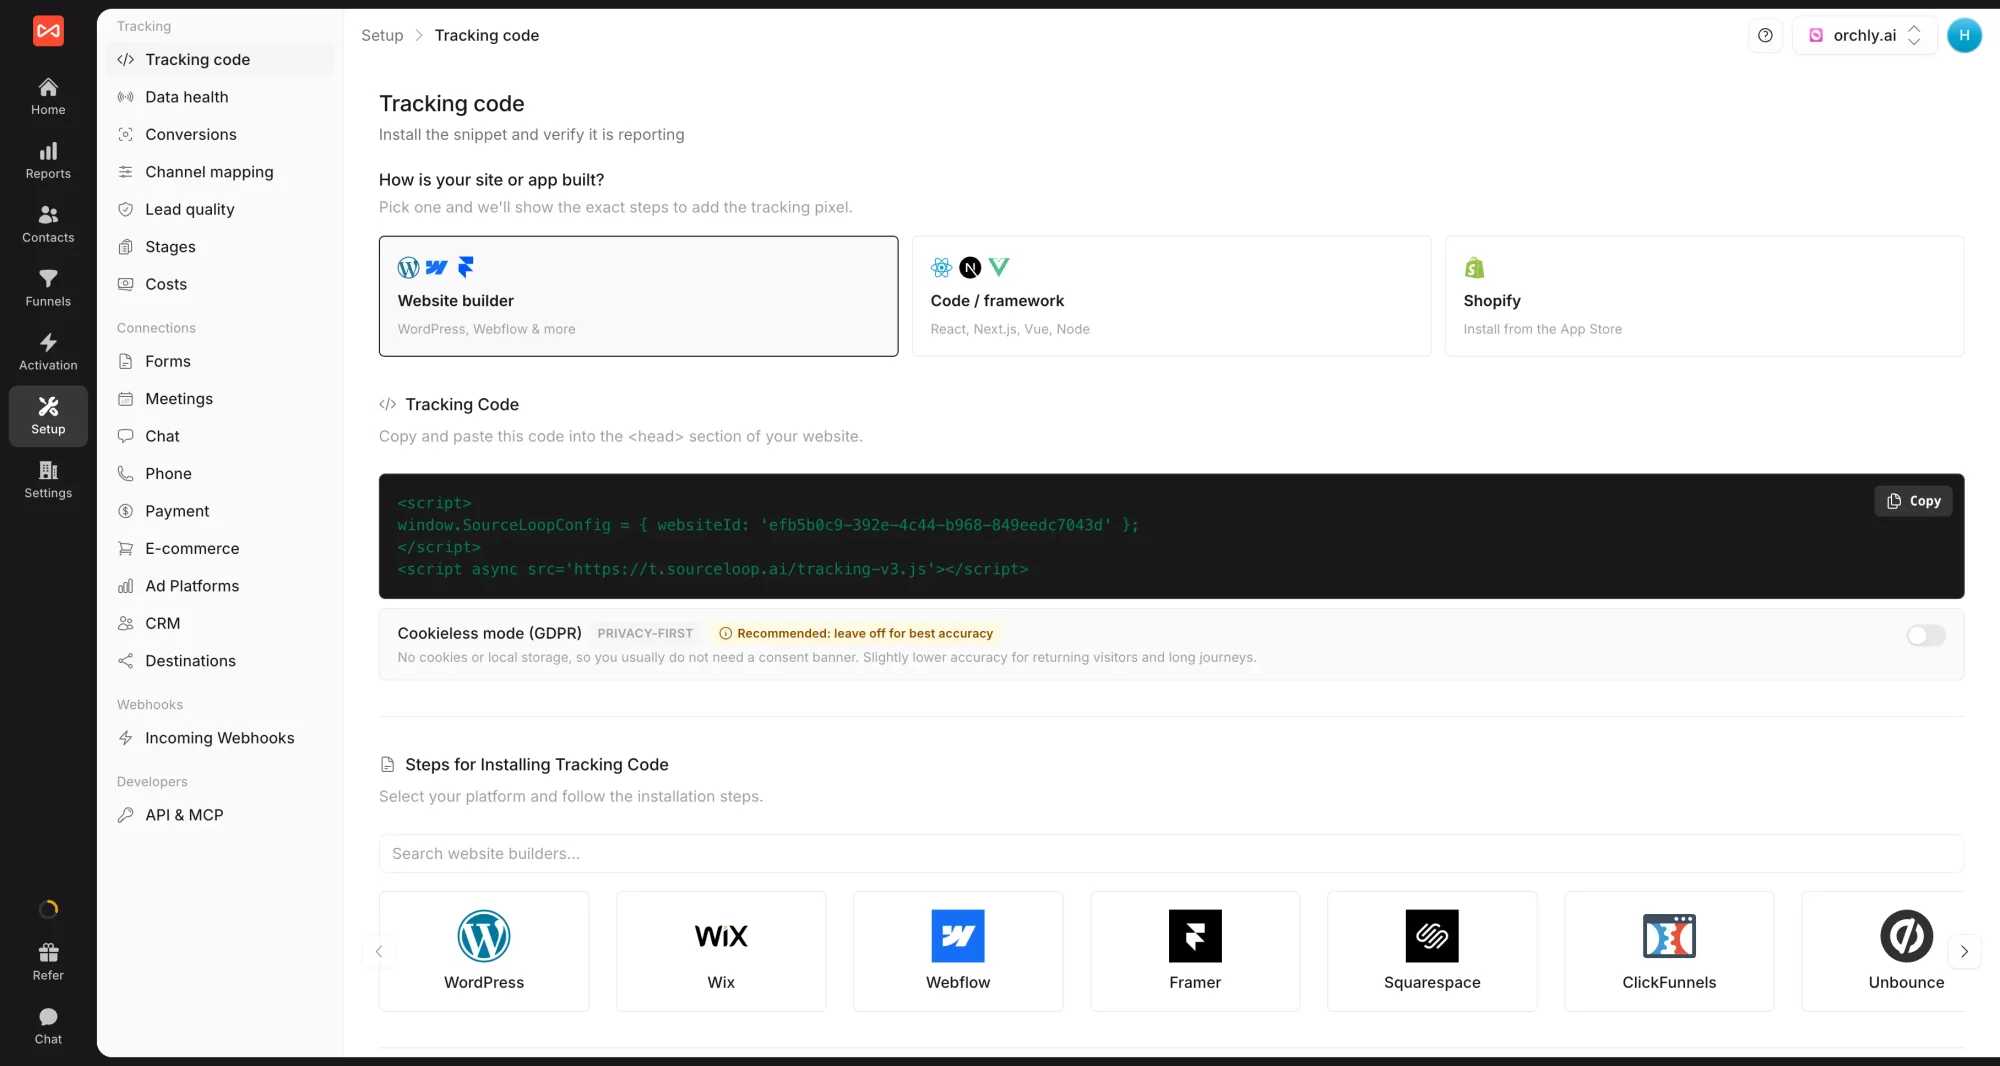
- Paste it into the
<head>of every page on your site, especially the pages where the Zendesk widget appears.
From this point on, every visitor session, UTM, and journey is being recorded. The next steps connect that data to the conversations Zendesk will start sending.
Step 2: Embed your Zendesk widget on the same pages
SourceLoop only attaches attribution when the Zendesk widget loads on a page that also has the SourceLoop tracker. If the widget is already embedded site-wide, you can move on to Step 3.
- In Zendesk, open Admin Center -> Channels -> Messaging (or Channels -> Classic -> Web Widget if your account still uses the legacy Chat product).
- Copy your widget code snippet. It looks like:
<script id="ze-snippet" src="https://static.zdassets.com/ekr/snippet.js?key=YOUR_KEY"></script>- Paste it inside the
<head>of your site, on the same pages as the SourceLoop snippet.
Once both scripts load on the same page, SourceLoop attaches the visitor’s attribution to every new conversation as Zendesk tags. You’ll see entries like sourceloop_id:abc123, channel:organic_search, landing_page:pricing in the Tags field on the left sidebar of the Agent Workspace when you open any new ticket.
Step 3: Create the Zendesk webhook
The webhook is the delivery channel for sending data from Zendesk to SourceLoop. You create it once; the next step creates a trigger that uses it.
-
In SourceLoop, open Setup -> Chat, click the Zendesk Chat card, and copy Your Zendesk Chat webhook URL from the drawer.
-
In Zendesk, open Admin Center -> Apps and integrations.
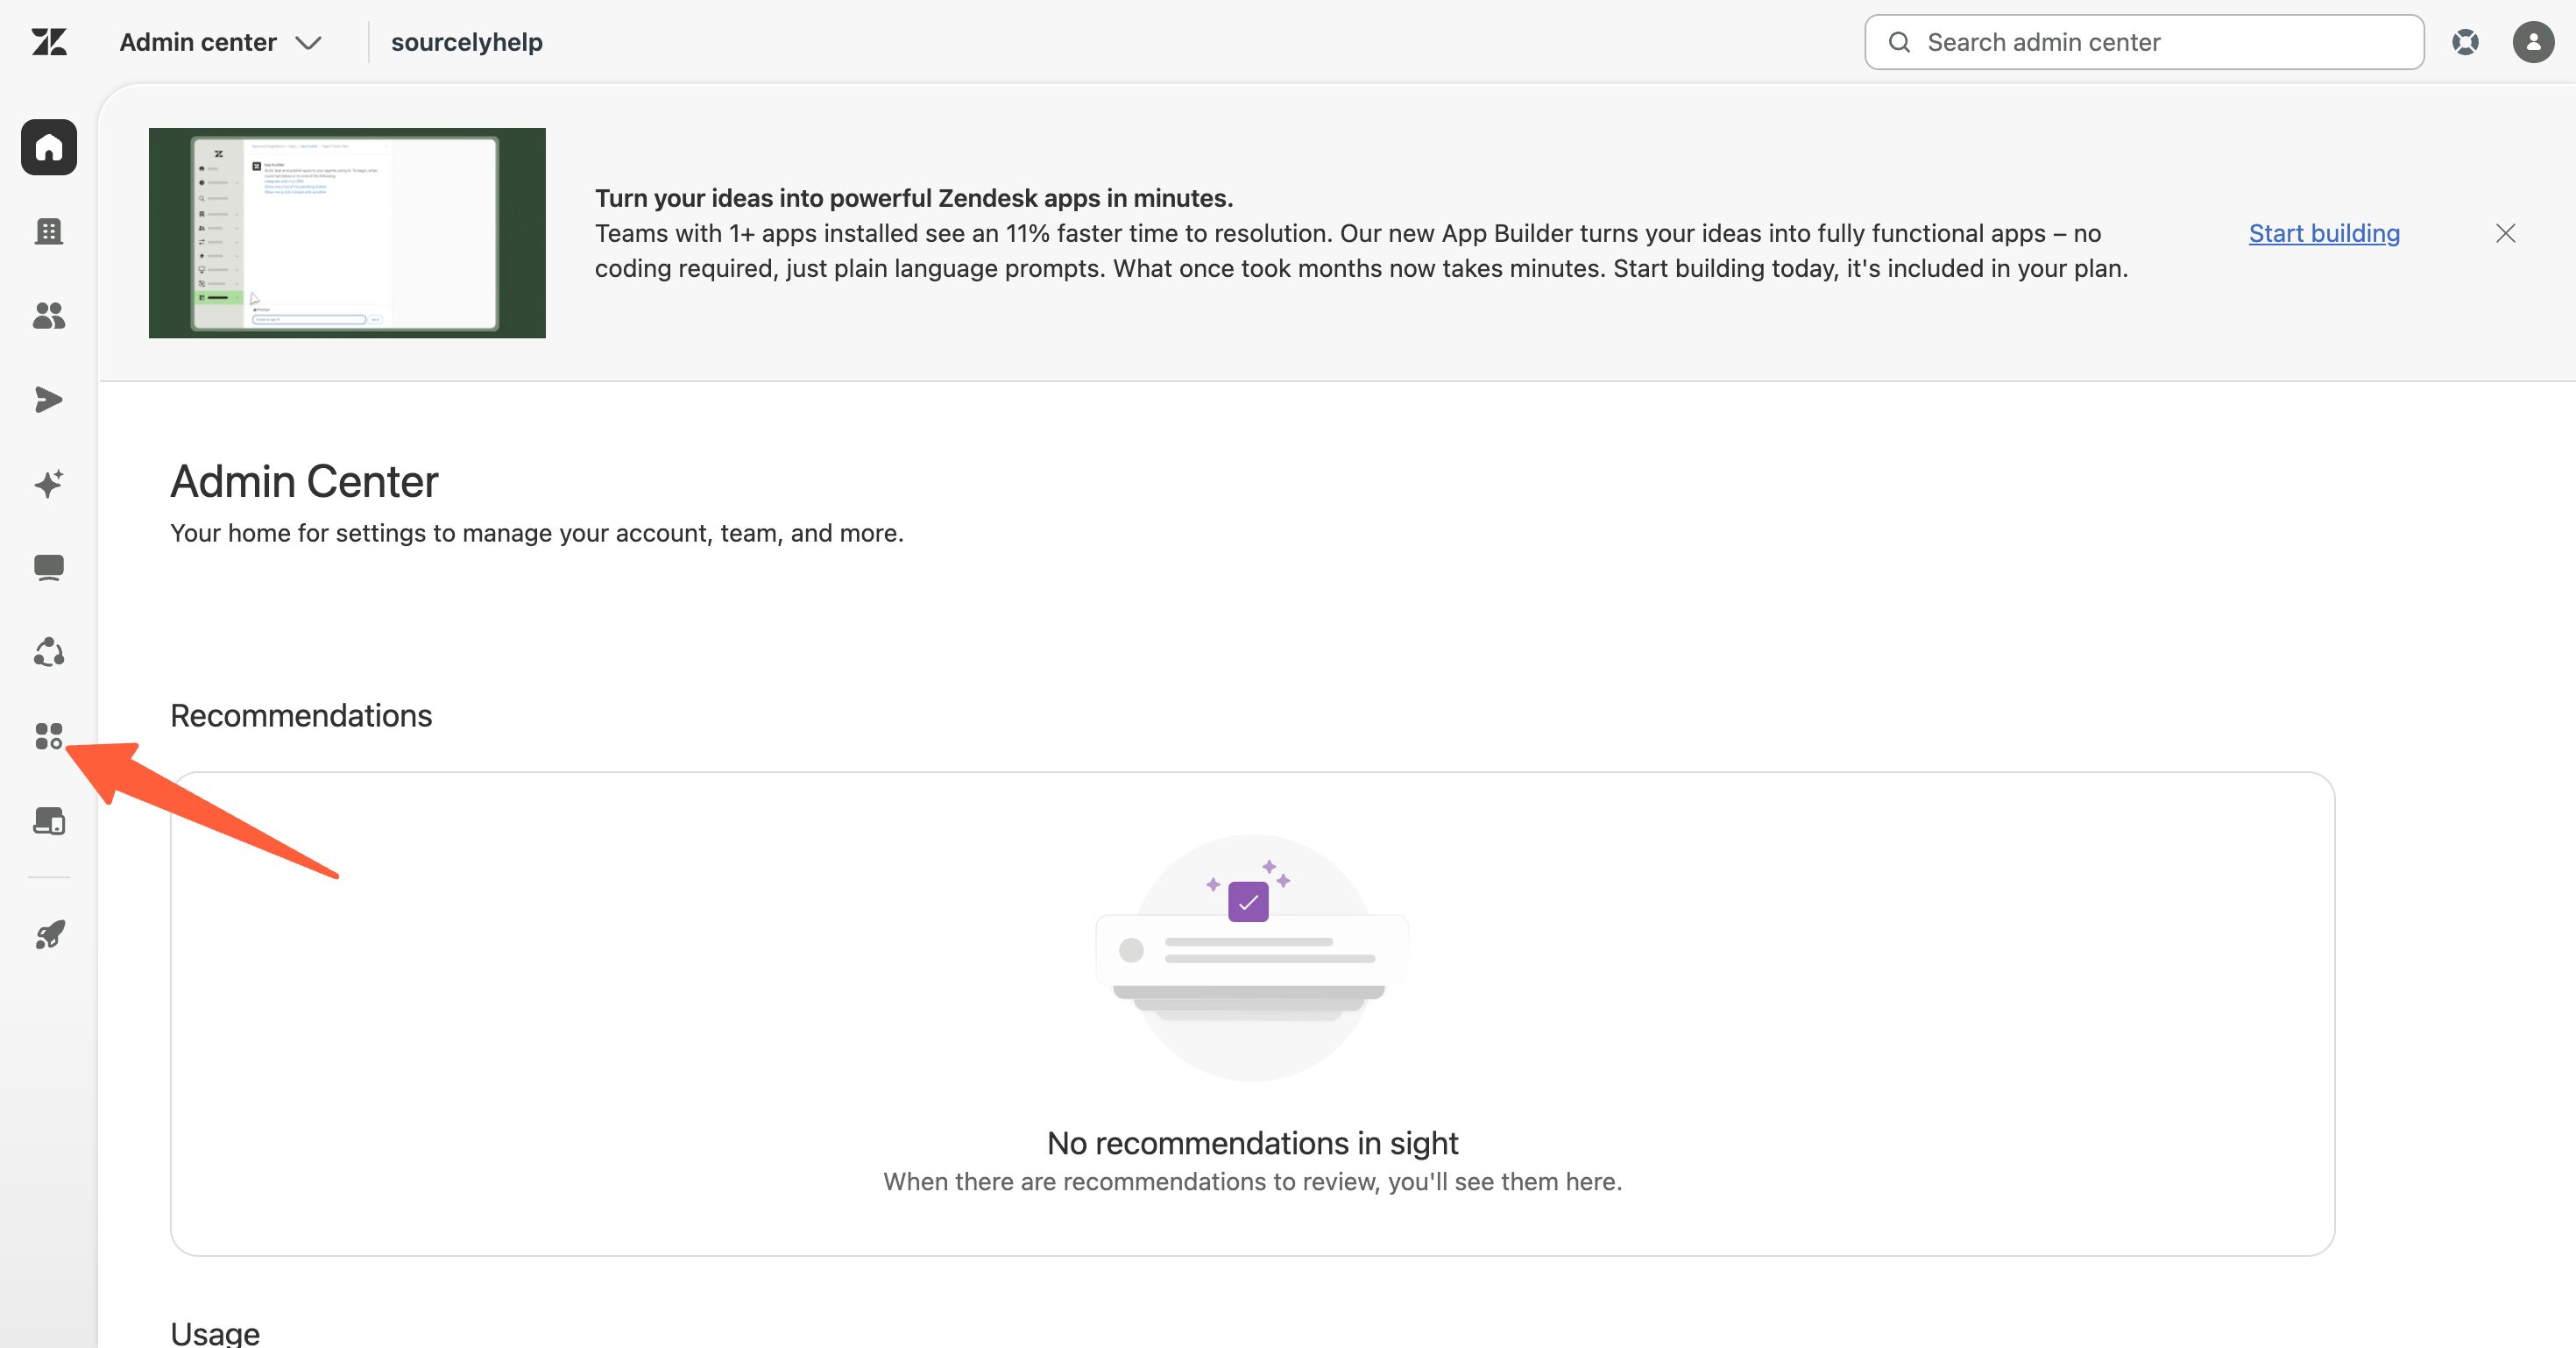
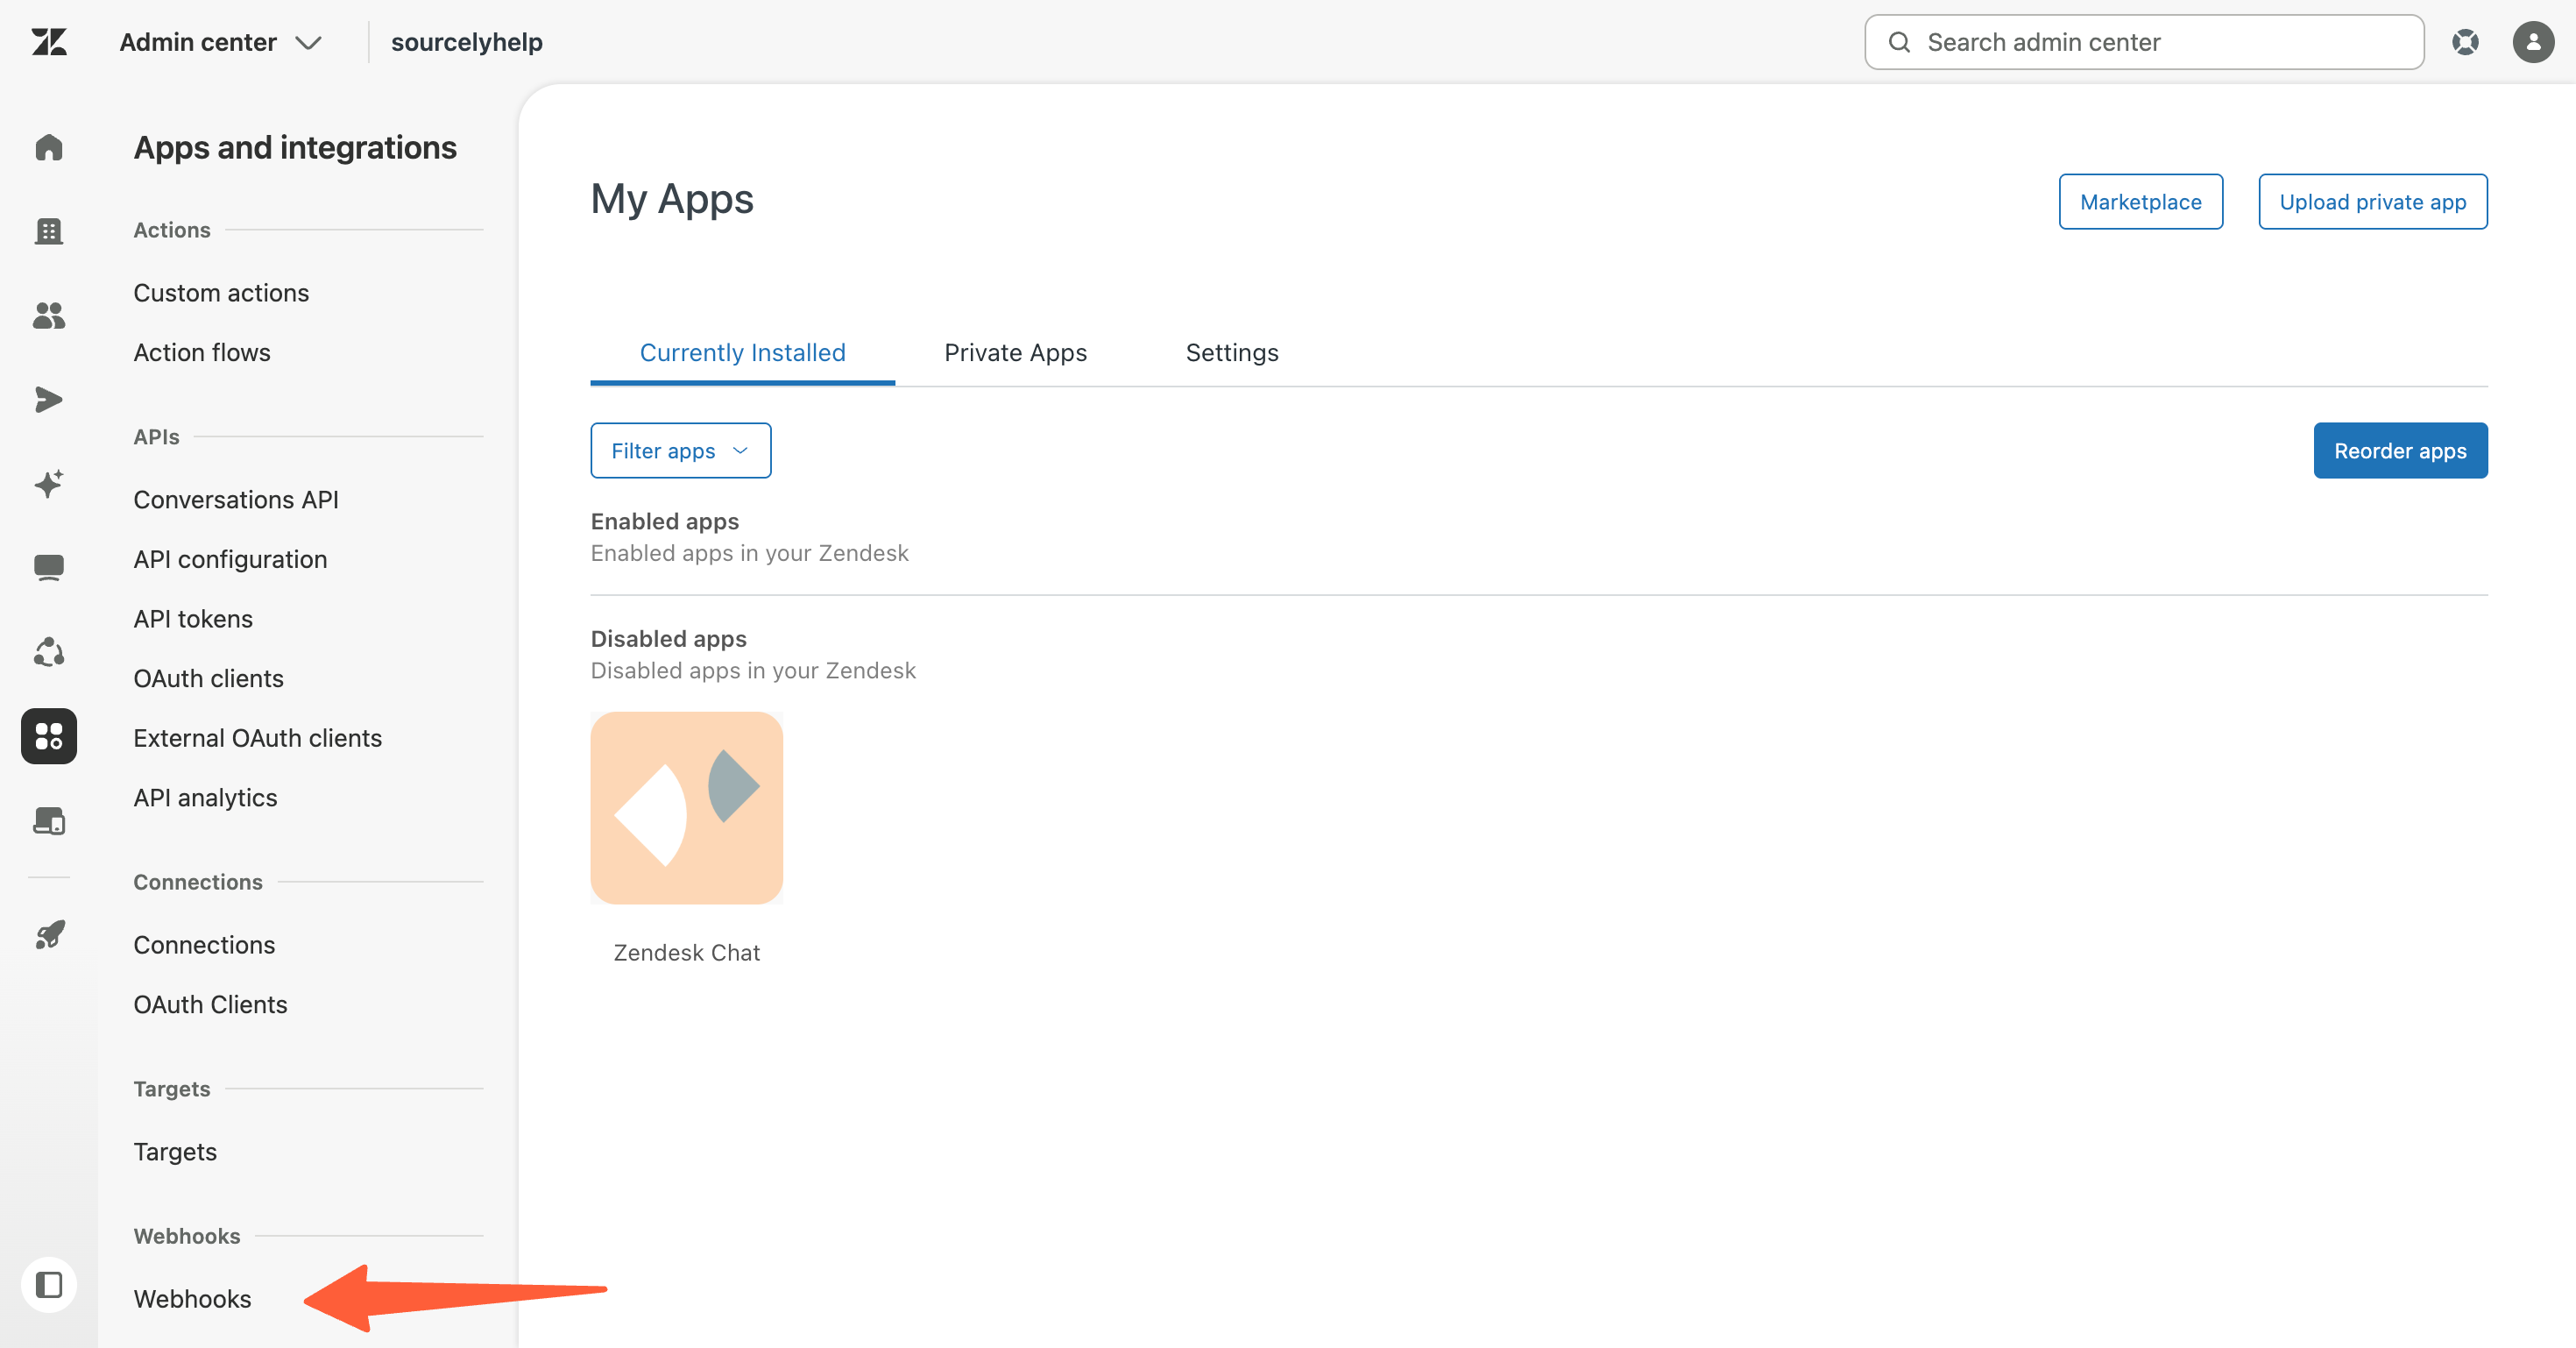
- Click Webhooks in the left sidebar, then Create webhook in the center.
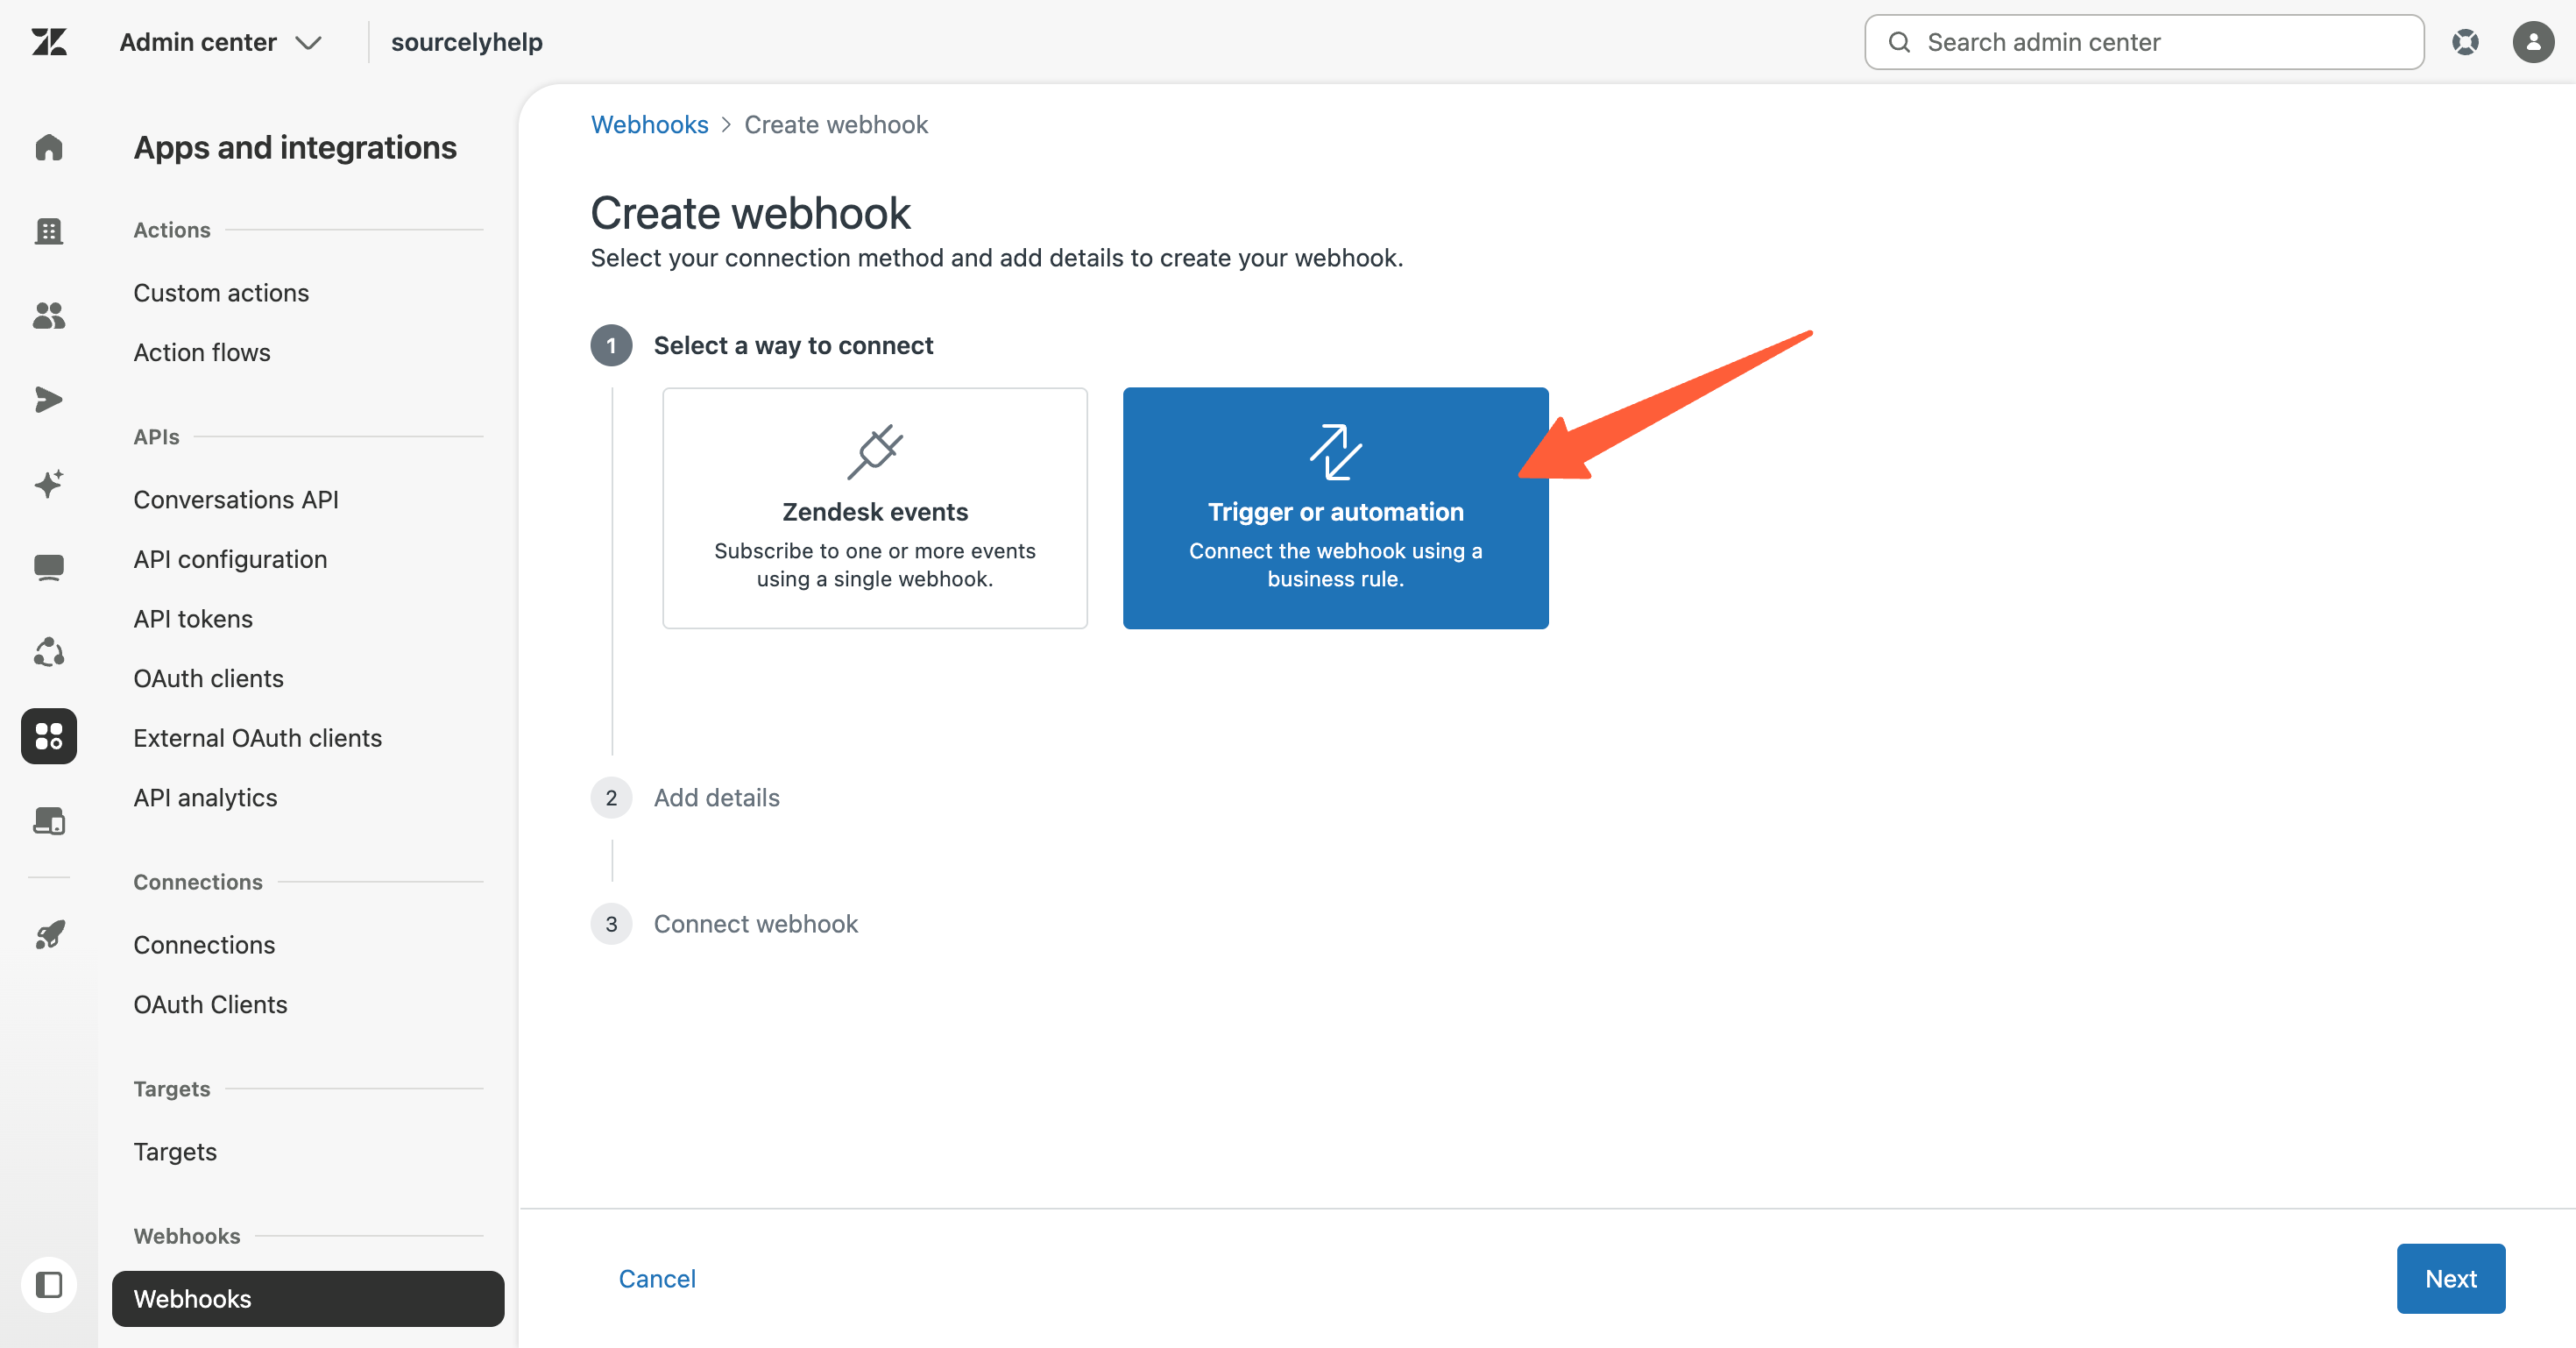
- On Select a way to connect, pick Trigger or automation on the right. Click Next.
- On Add details, fill in:
- Name:
SourceLoop - Description: leave blank or write “SourceLoop attribution”
- Endpoint URL: paste the URL you copied from SourceLoop in step 1
- Request method:
POST - Request format:
JSON - Authentication:
None
- Name:
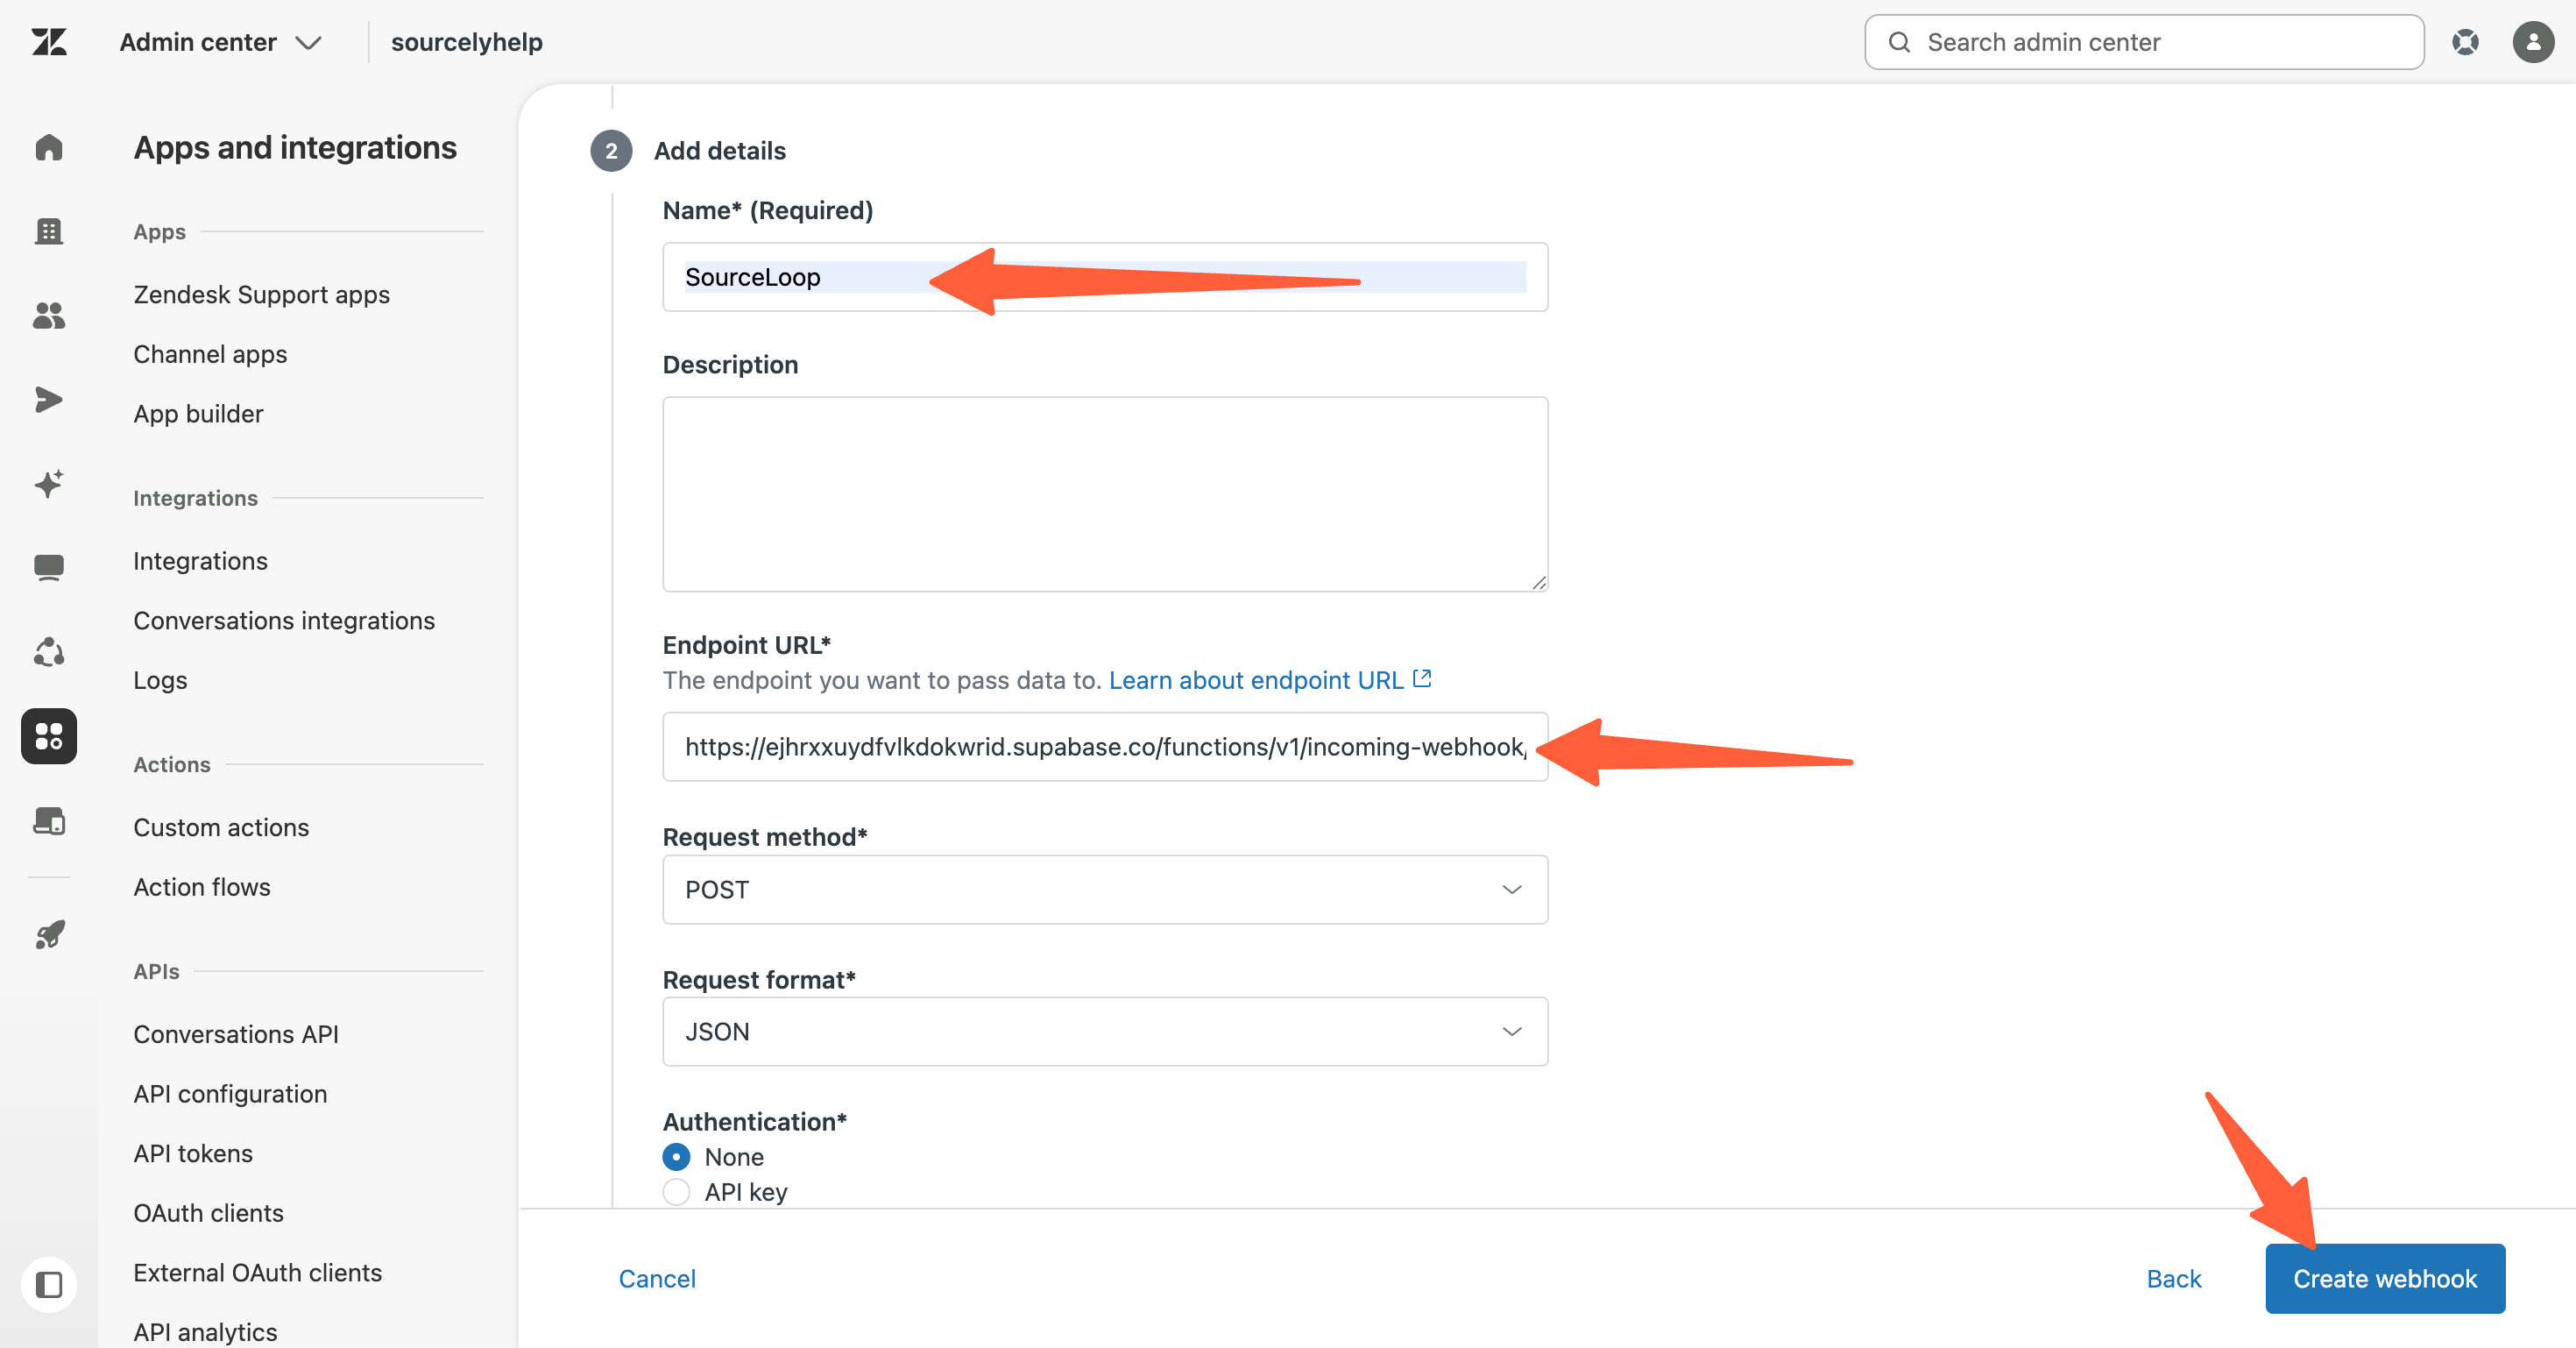
- Click Create webhook. Zendesk will offer to send a test webhook, you can skip it.
The webhook now exists but is inert until something sends data to it. Move to Step 4.
Step 4: Create the trigger that fires on new conversations
The trigger is what hands every new Messaging ticket to the webhook in real time.
- In Zendesk, open Admin Center -> Objects and rules -> Business rules -> Triggers.
- Click Add trigger in the top right.
- Fill in the basics:
- Trigger name:
Send to SourceLoop - Description:
Forward every new Messaging conversation to SourceLoop attribution - Category: pick any (or create one named “SourceLoop”)
- Trigger name:
- Under Conditions -> Meet ALL of the following conditions, click Add condition and set:
- Ticket > Channel | Is | Messaging
- Ticket > Ticket | Is | Created
- Under Actions, click Add action and set:
- Notify by | Active webhook | SourceLoop
- Paste this JSON body:
{
  "chat_id": "zendesk:{{ticket.id}}",
  "email": "{{ticket.requester.email}}",
  "name": "{{ticket.requester.name}}",
  "phone": "{{ticket.requester.phone}}",
  "tags": "{{ticket.tags}}",
  "subject": "{{ticket.title}}",
  "type": "Chat"
}- Click Create.
From now on, every new Messaging ticket fires this trigger at creation time, and Zendesk POSTs the ticket details (including the sourceloop_id: tag) to SourceLoop.
Step 5: Add an automation to catch late-email tickets
The trigger from Step 4 fires the moment a Messaging ticket is created. But Zendesk Messaging usually asks for the visitor’s name first and email a step or two later, so the ticket often exists before the email arrives. Zendesk does not re-fire the trigger when the visitor later adds their email (because email lives on the user record, not the ticket).
This automation runs hourly and re-sends the ticket to SourceLoop. SourceLoop ignores any fire that still has no email (no half-empty leads appear in your Contacts) and dedups identical fires by chat_id. As soon as one of those hourly fires lands with the email present, the conversion is created.
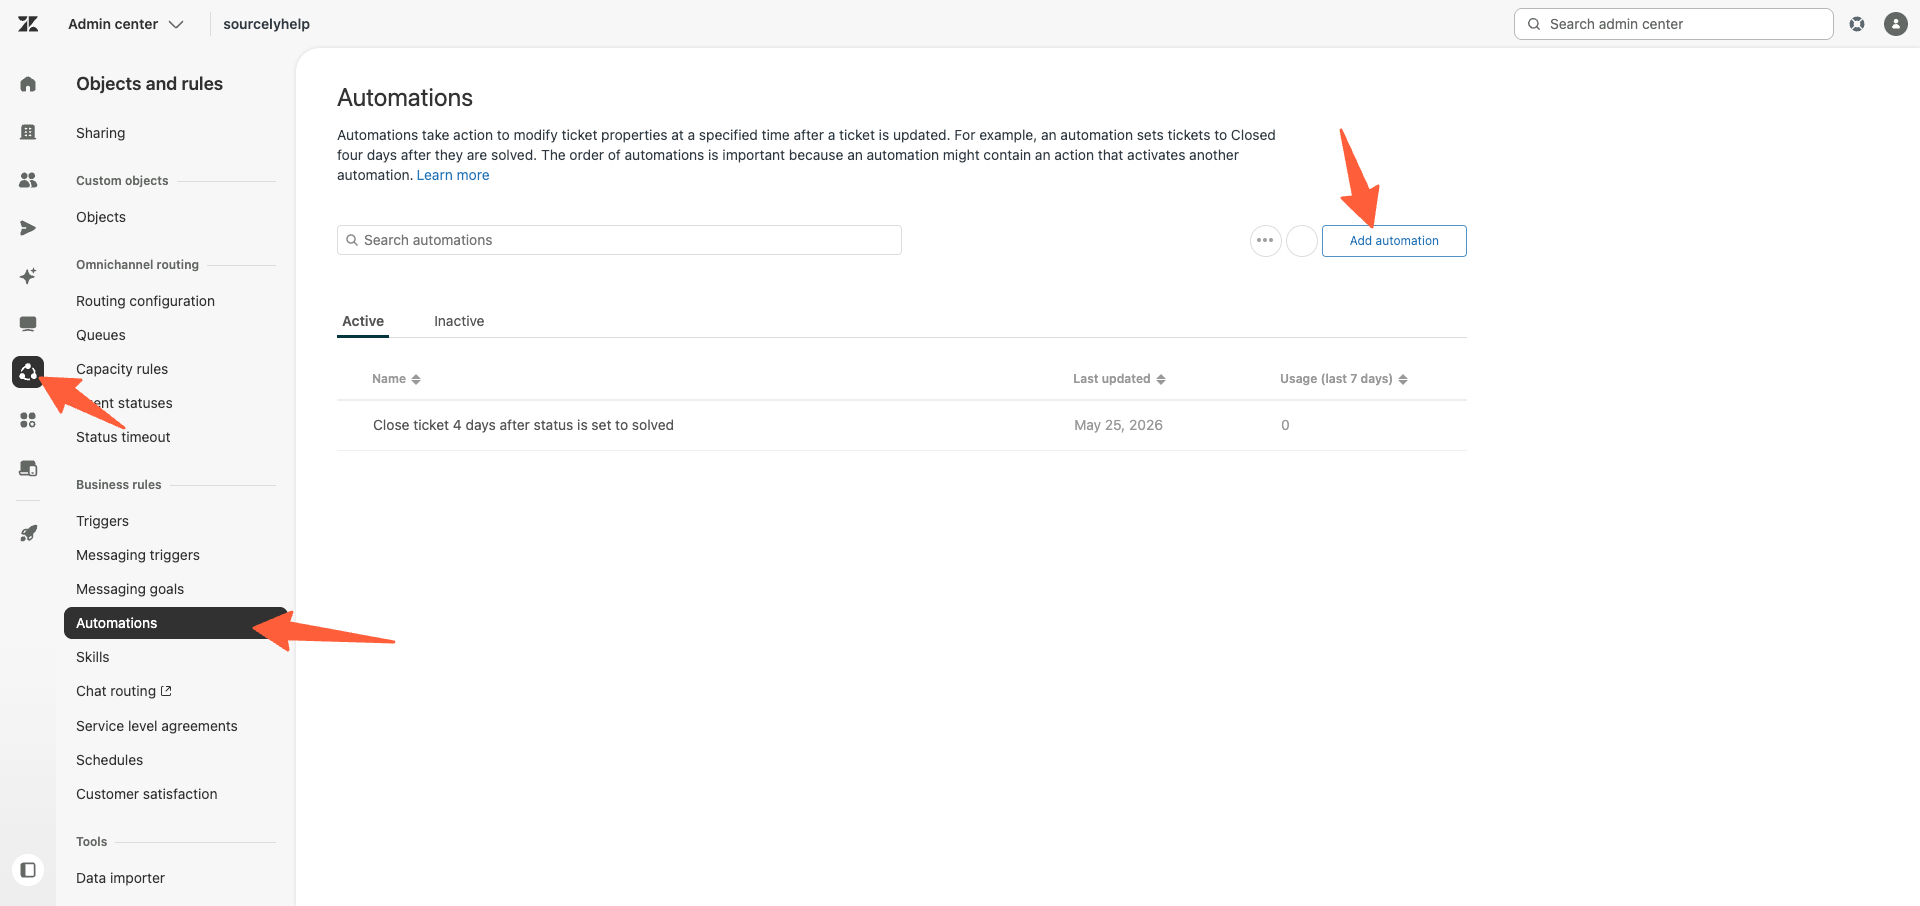
- In Zendesk, open Admin Center -> Objects and rules -> Business rules -> Automations.
- Click Create automation in the top right.
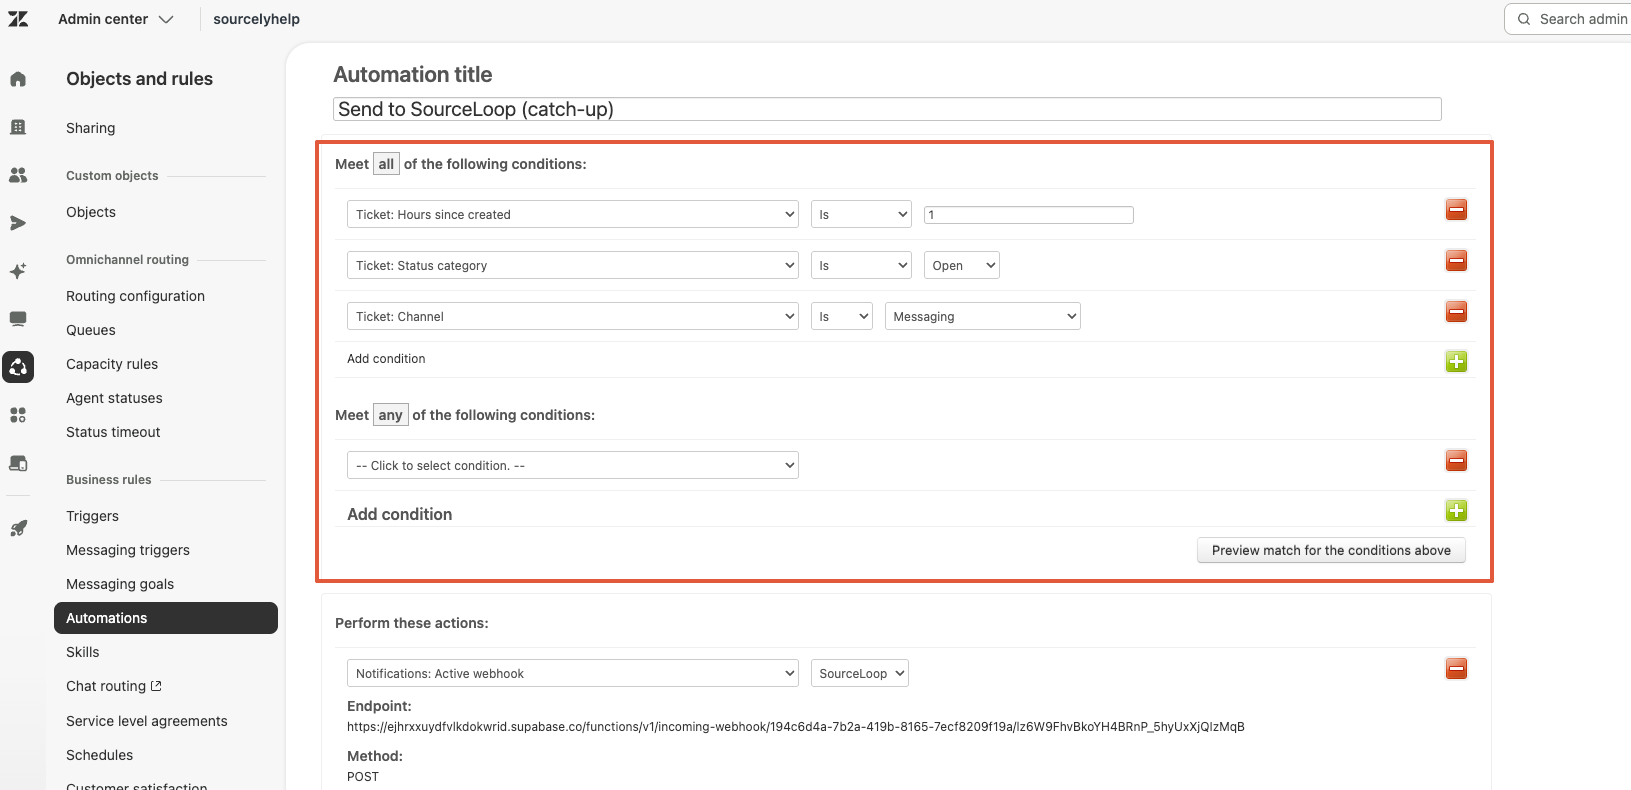
- Fill in the basics:
- Automation name:
Send to SourceLoop (catch-up) - Description:
Hourly backstop for Messaging tickets where email arrives after creation
- Automation name:
- Under Conditions -> Meet ALL of the following conditions, click Add condition three times and set:
- Ticket > Status category | Is | Open
- Ticket > Channel | Is | Messaging
- Ticket > Hours since created | Is | 1
- Under Actions, click Add action and set:
- Notify by | Active webhook | SourceLoop
- Paste the same JSON body as the trigger in Step 4:
{
  "chat_id": "zendesk:{{ticket.id}}",
  "email": "{{ticket.requester.email}}",
  "name": "{{ticket.requester.name}}",
  "phone": "{{ticket.requester.phone}}",
  "tags": "{{ticket.tags}}",
  "subject": "{{ticket.title}}",
  "type": "Chat"
}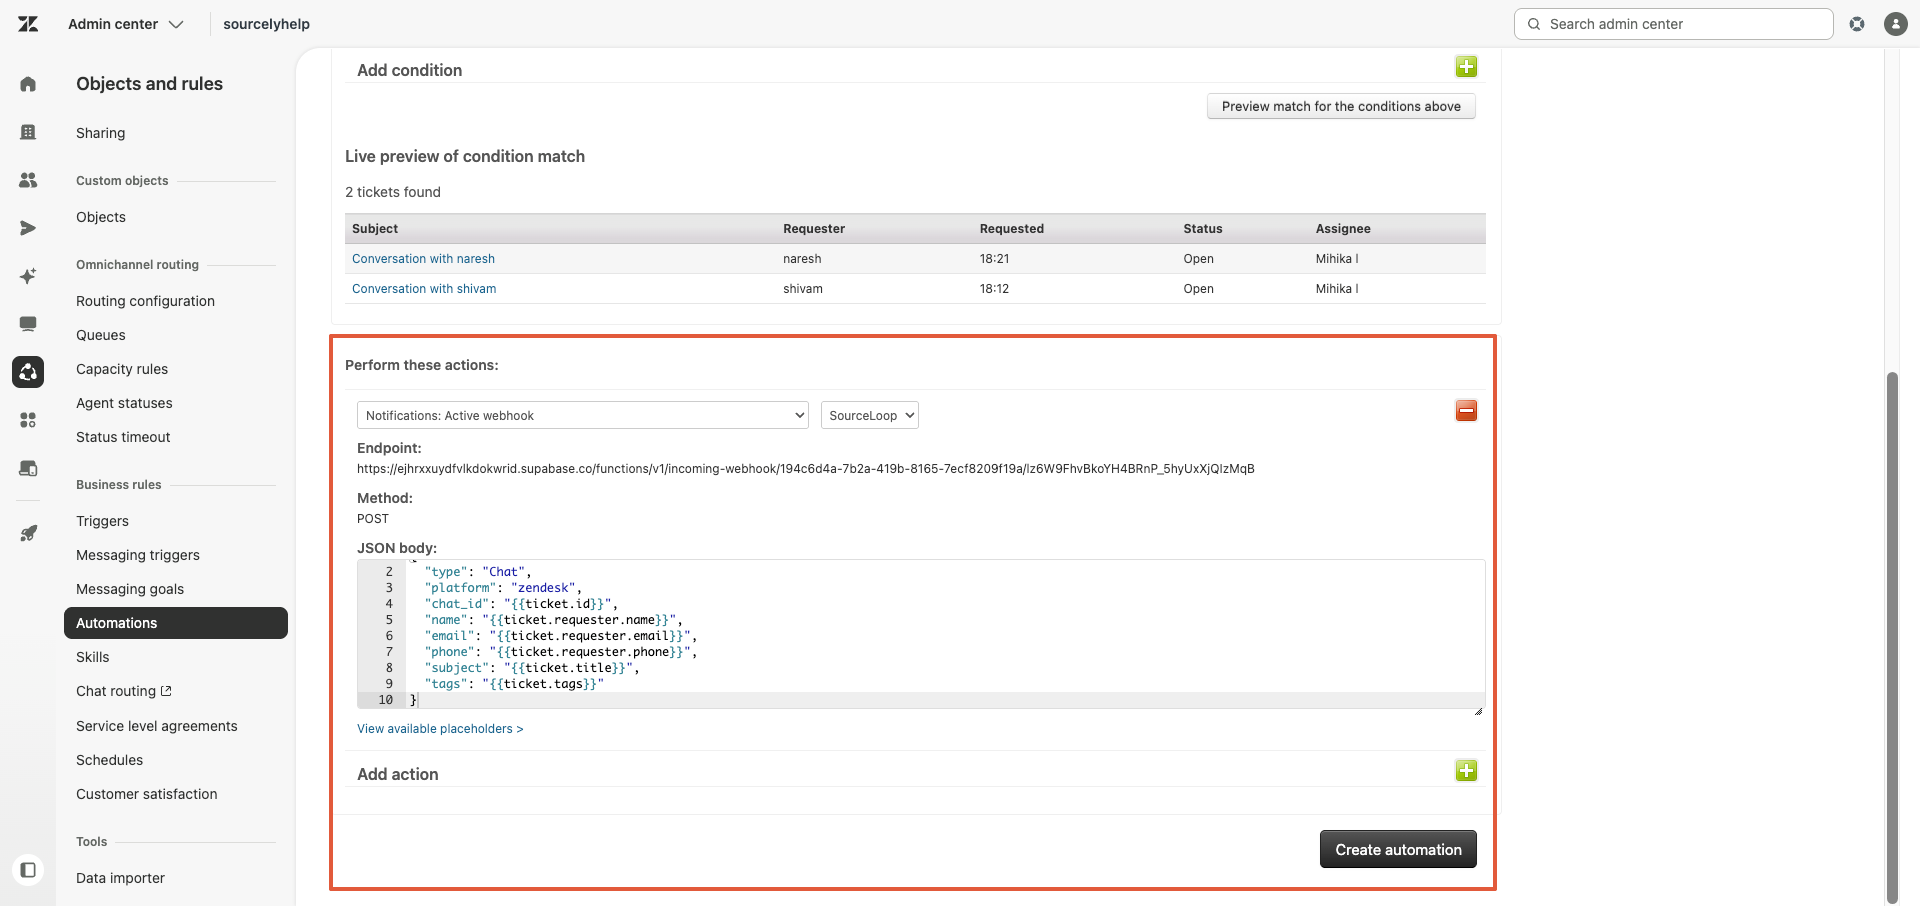
- Click Create automation.
Step 6: Run a verification chat
Open your site in an incognito tab with ?utm_source=test&utm_medium=verify&utm_campaign=zendesk-check appended to the URL. Click the Zendesk widget, start a conversation, and share an email you can access.
If your Messaging flow asks for the email during the first conversation, the lead should appear in Contacts within seconds. If the bot asks for the email later or never during that session, wait up to two hours for the hourly automation to catch up.
Where to see Zendesk conversations in SourceLoop
Contacts
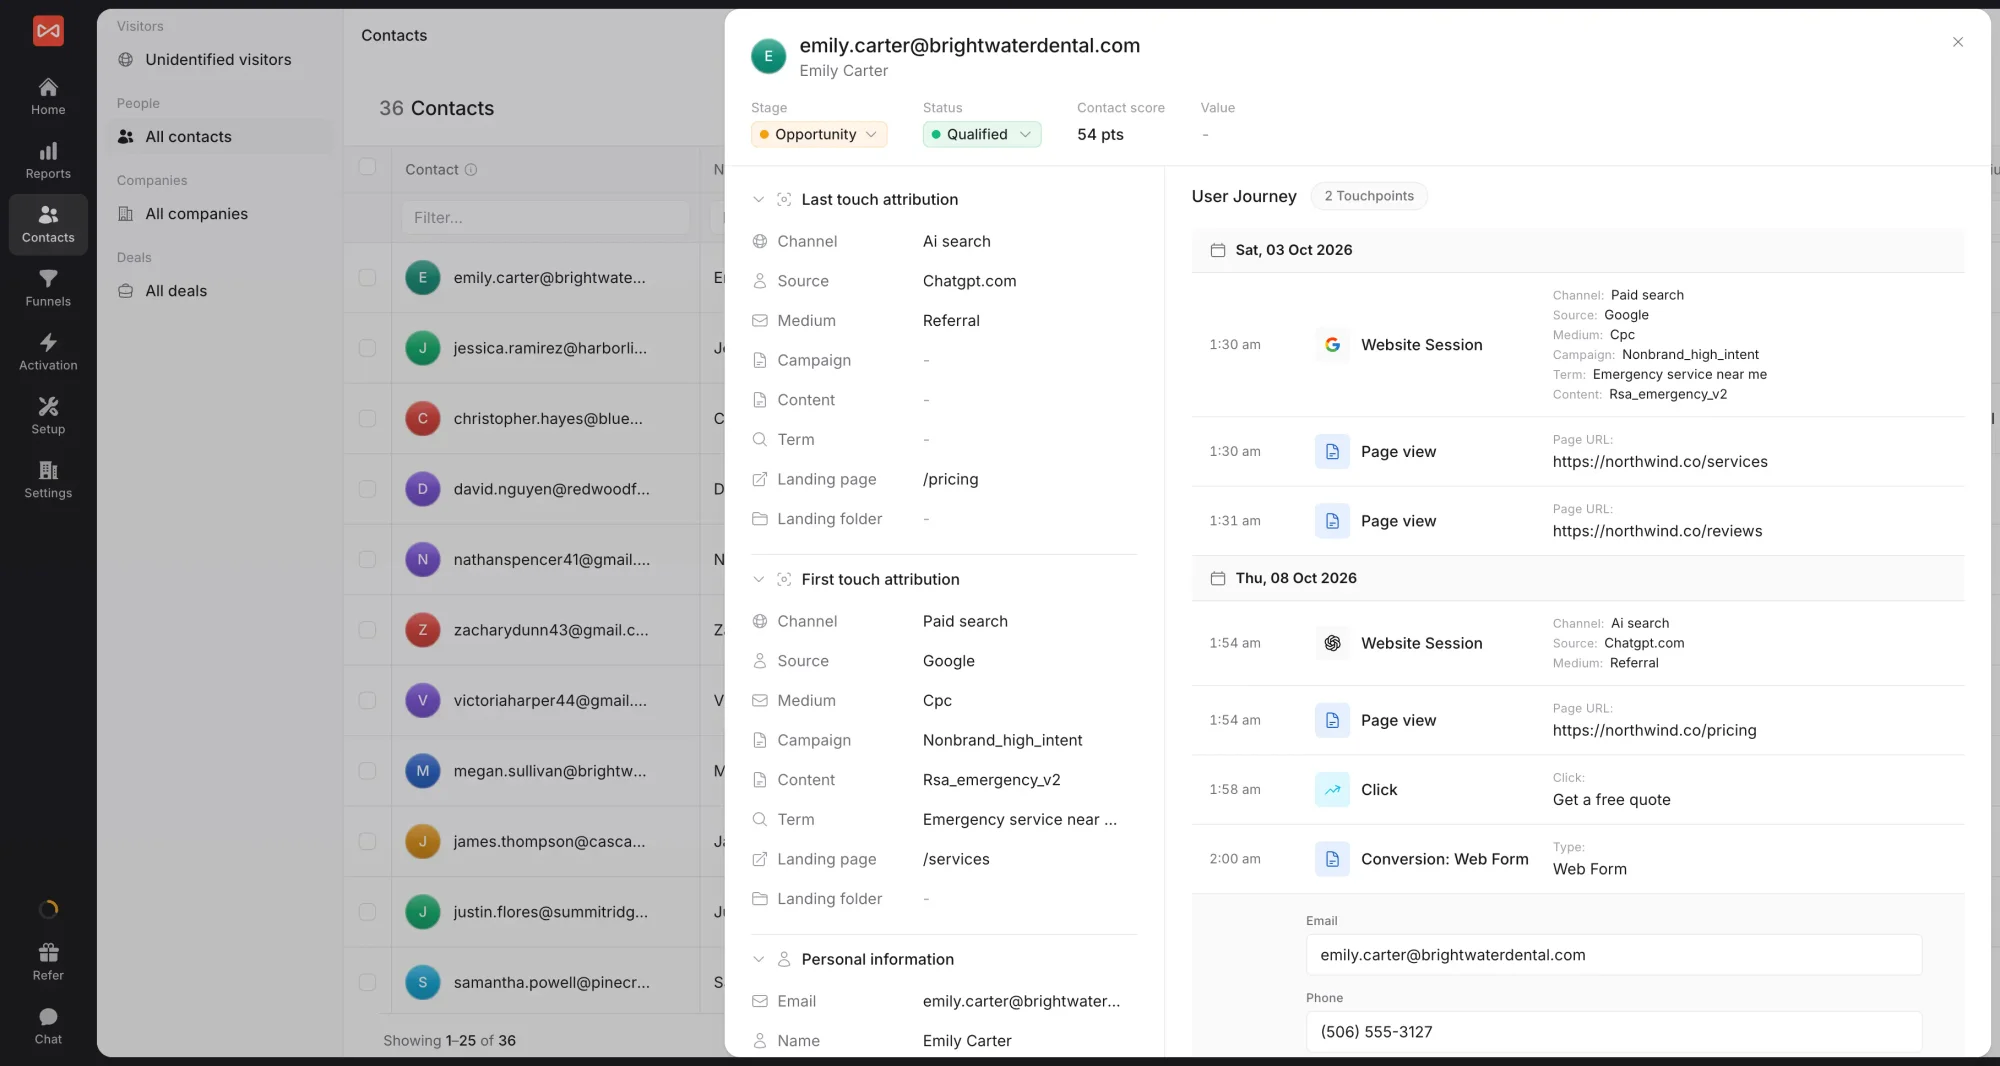
Every Zendesk conversation that captures an email becomes a contact row at app.sourceloop.ai/contacts. Open a contact for the visitor’s complete pre-chat browsing history, useful context for the agent (or bot) before they respond.
Traffic and Revenue report
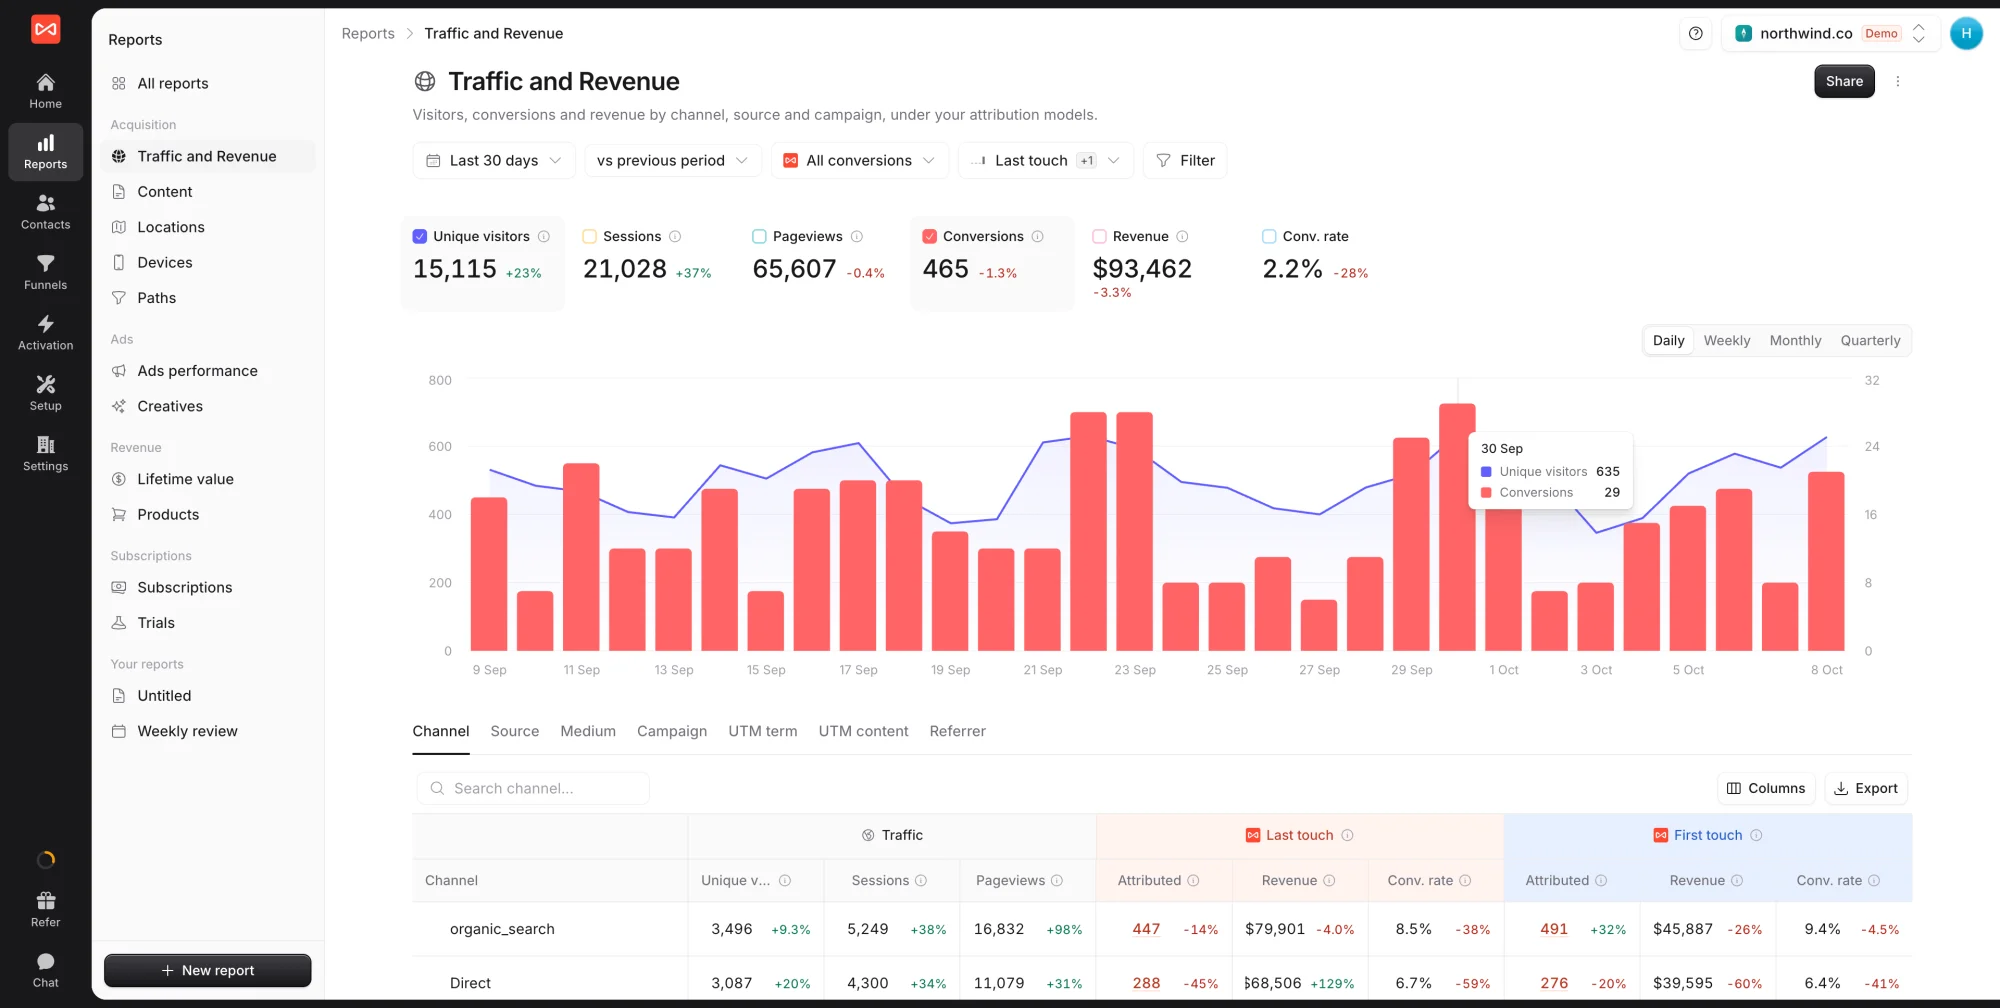
For the channel-level rollup, app.sourceloop.ai/reports/traffic groups Zendesk conversations by source, medium, and campaign so you can see which marketing channels actually open dialogue with real prospects vs. which only generate pageviews.
Funnel reports
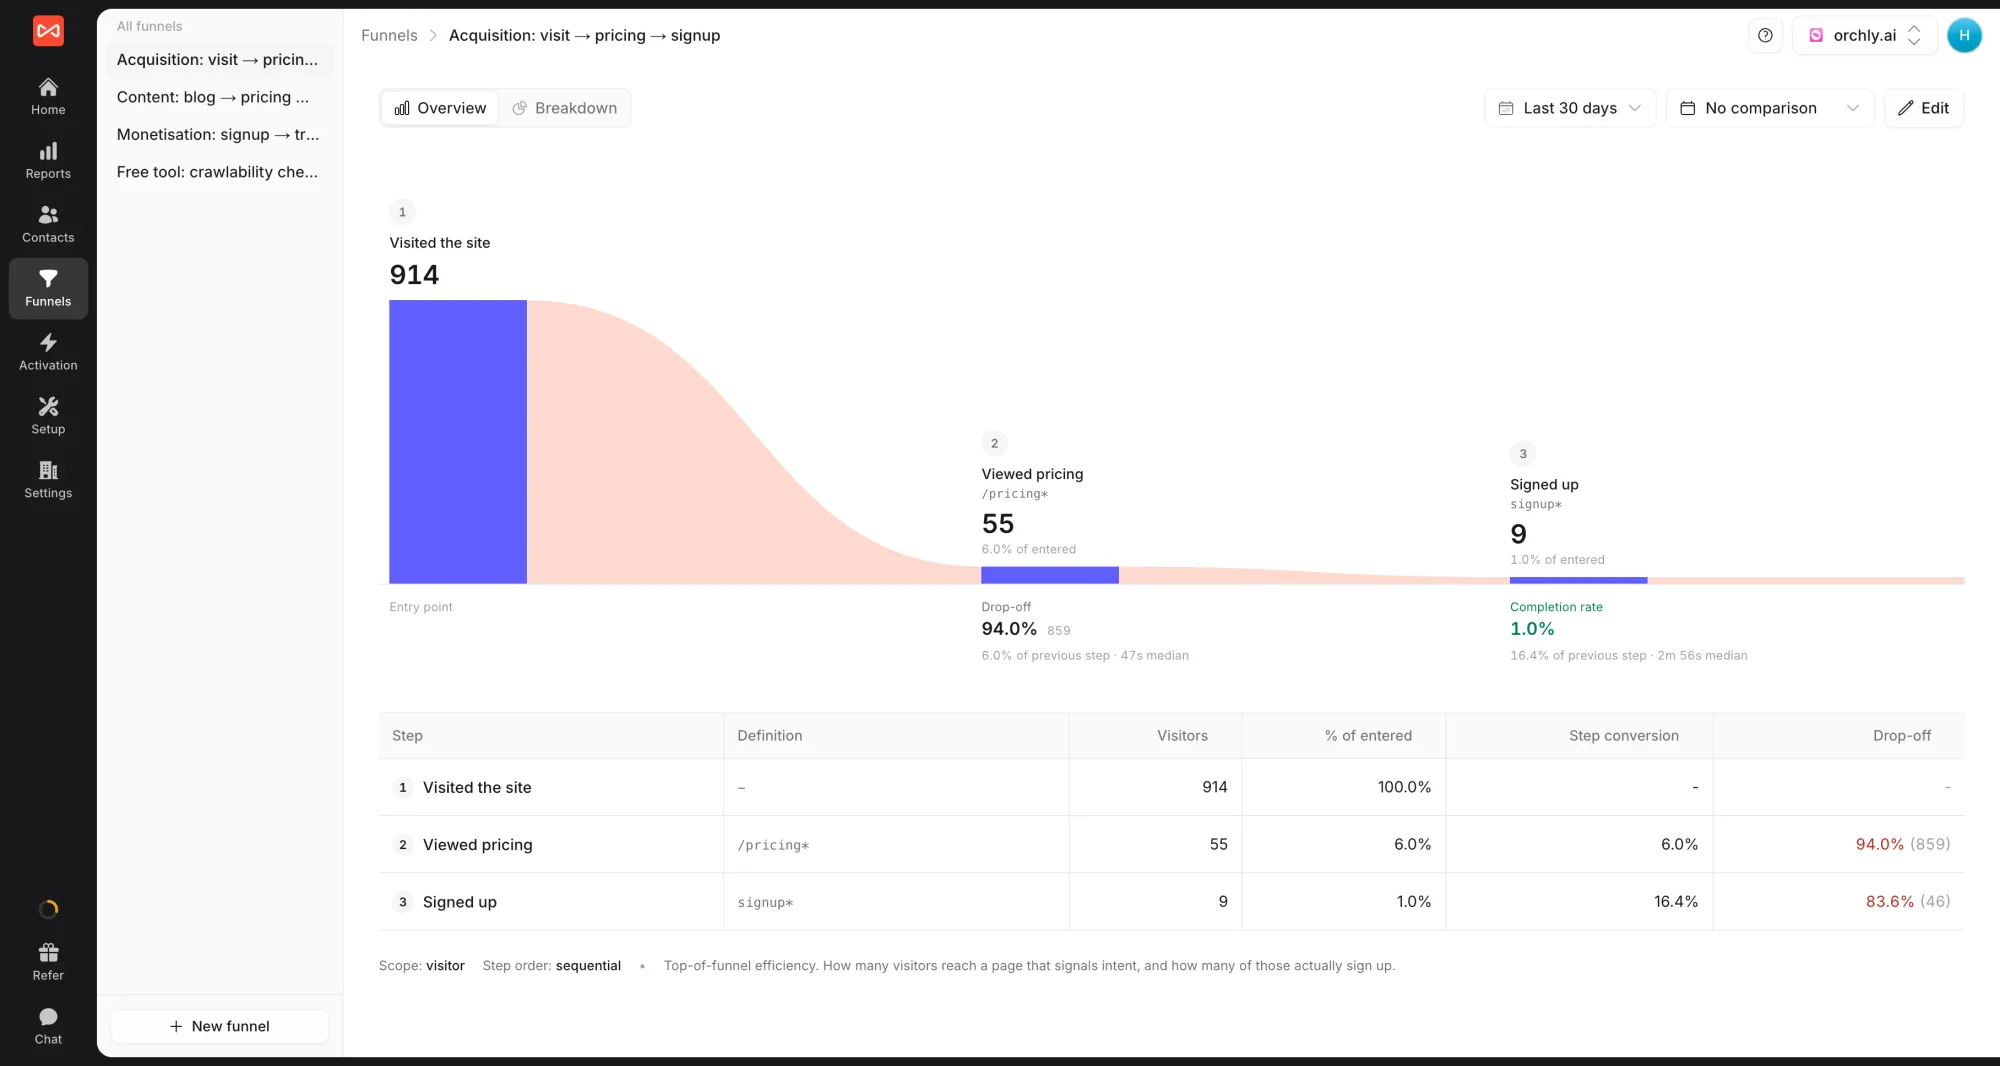
Build a funnel at app.sourceloop.ai/funnels ending in “Zendesk Chat conversation”. Slice by source, landing page, or device to find the highest-converting routes from first visit to chat opened.
For paid acquisition feeding the chat queue, mirror Zendesk conversations back to Google Ads and Meta as offline conversions so the bidding algorithms train on real qualified conversations instead of vanity clicks. The conversion sync guide covers the wiring.
Frequently asked questions
-
Does this work with Zendesk Messaging (the modern widget) and the legacy Web Widget Chat?
Yes, both. The setup is the same. Modern Messaging accounts use Admin Center -> Channels -> Messaging for the widget; older accounts still on the classic Chat product use Channels -> Classic -> Web Widget. Either widget exposes the same tagging API SourceLoop uses to attach attribution to the conversation.
-
Why do I need to set up a webhook plus a trigger plus an automation? Can't this be one piece?
Three reasons. The webhook is just the URL Zendesk POSTs to. The trigger is what fires on ticket creation (the real-time path). The automation is a backstop because Zendesk Messaging tickets often get created BEFORE the visitor has shared their email, and Zendesk doesn't re-fire the trigger when the email lands later. The hourly automation re-sends the ticket once email is present.
-
How does the late-email backstop avoid creating duplicate leads?
Every fire (real-time trigger and hourly automation) carries the same `chat_id` (Zendesk's ticket ID prefixed with `zendesk:`). SourceLoop dedups on `chat_id`, so multiple fires for the same ticket land as a single lead. Fires that arrive without an email are silently ignored (no half-empty leads appear in your Contacts).
-
How long after a Messaging chat does a late-email lead appear in SourceLoop?
Real-time if the visitor shares their email during the conversation that creates the ticket. 1 to 2 hours if the email arrives after ticket creation, because Zendesk automations run on a roughly hourly cycle and that cadence can't be sped up on the trial plan.
-
My Messaging bot only asks for a name, not an email. Will SourceLoop still capture the lead?
No. SourceLoop creates a lead only when an email (or phone number) is present. Open your Messaging flow in Admin Center -> Channels -> Messaging, find the answer/flow used at conversation start, and add a required Email step. Without one, the visitor stays anonymous and no lead is created.
-
Conversations from a Zendesk-hosted Help Center page, not my main site. Do those get attribution?
No. The marketing journey (UTMs, channel, landing page) lives in the SourceLoop tracker on your own site. If a visitor opens the chat from a Zendesk-hosted Help Center page (yourbrand.zendesk.com/...), the tracker never runs on that page and there's no journey to attach. Route paid campaigns to pages on your own domain where the widget appears.
-
Will my existing Zendesk triggers, automations, and CRM integrations keep working?
Yes. The trigger and automation you create for SourceLoop sit alongside everything else you have set up. SourceLoop receives its own copy of the ticket data via the webhook; every other Zendesk destination (Salesforce, HubSpot, Slack alerts, etc.) continues to receive ticket events unchanged.
-
I support Zendesk via the mobile SDK in my app. Are mobile chats tracked?
Web sessions are the scope of SourceLoop's marketing-source data. Mobile-app conversations through Zendesk's SDK don't have a browser journey to attach, so they arrive as Direct.

 Paid Social


